Last Updated on September 24, 2023 by KnownSense
The State Pattern is a behavioral design pattern that allows an object to alter its behavior when its internal state changes. The pattern encapsulates states as separate classes and delegates the state-specific behavior to these classes. This makes it easy to add new states and modify the behavior of an object without altering its structure.
Consider a vending machine that can be in various states like “No Money,” “Ready to Dispense,” or “Out of Stock” Without using the State Pattern in a vending machine, you risk encountering complex, error-prone code with extensive conditional logic. This approach often leads to code duplication, limited extensibility, and high coupling between states and behaviors. Testing and maintaining such code can be challenging, and scalability issues may arise as the system’s complexity grows. The State Pattern provides a structured solution by encapsulating each state’s behavior in separate classes, enhancing code readability, maintainability, and extensibility while reducing the risk of errors.
Benefits
- Clean Code Organization: It promotes clean and modular code by encapsulating each state in a separate class. This separation of concerns makes the codebase more organized and easier to understand.
- Improved Readability: State-specific behavior is clearly defined within individual state classes. This enhances code readability and makes it easier for developers to comprehend and maintain the code.
- Scalability: Adding new states or modifying existing ones is straightforward. You can introduce new state classes without affecting the context class, making the system more scalable and extensible.
- Reduced Conditional Complexity: The State Pattern eliminates complex conditional statements that would otherwise be needed to manage object behavior based on its state. This leads to simpler, more maintainable code.
- Reusability: State classes can be reused in different contexts or for different objects that exhibit similar state-based behavior. This reusability reduces development time and effort.
- Centralized State Logic: State-specific logic is centralized within each state class. This means that if a change is required in a specific state, you only need to modify that state’s class, keeping the codebase isolated and less error-prone.
- Enhanced Testing: Testing becomes more straightforward as you can focus on testing individual state classes in isolation. This leads to more effective unit testing and better code coverage.
- State Transition Control: The pattern provides a clear mechanism for managing state transitions, ensuring that they occur correctly and according to the defined rules.
- State Behavior Flexibility: The State Pattern allows for varying behavior within different states, making it suitable for modeling complex systems with multiple distinct states.
- Support for Finite State Machines (FSMs): When modeling systems with finite state machines, the State Pattern aligns well with the concepts and transitions inherent in FSMs.
- Maintenance and Debugging: Debugging and maintaining the code are simplified since each state’s behavior is isolated, reducing the risk of introducing unintended side effects when making changes.
UML of State Pattern
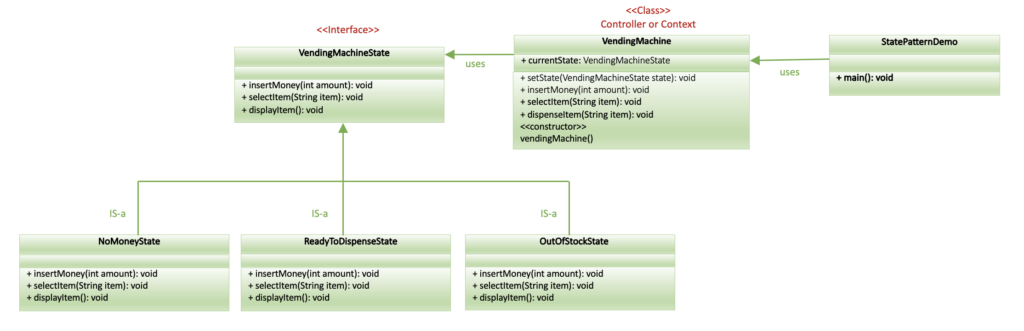
Implementation
Let’s implement the State Pattern for a vending machine with states like “No Money,” “Ready to Dispense,” or “Out of Stock” as discount above.
Step1: Create a VendingMachineState interface that will provide the staets to the Controller class.
interface VendingMachineState {
    void insertMoney(int amount);
    void selectItem(String item);
    void dispenseItem();
}
Step2: Create the concrete classes that represent the different states and will implement the VendingMachineState interface.
class NoMoneyState implements VendingMachineState {
    @Override
    public void insertMoney(int amount) {
        System.out.println("Money inserted: " + amount + " cents");
        // Transition to the ReadyToDispenseState if enough money is inserted
        // Transition to the NoMoneyState if not enough money is inserted
    }

    @Override
    public void selectItem(String item) {
        System.out.println("Please insert money first.");
    }

    @Override
    public void dispenseItem() {
        System.out.println("Please insert money first.");
    }
}
class ReadyToDispenseState implements VendingMachineState {
@Override
public void insertMoney(int amount) {
System.out.println("Money inserted: " + amount + " cents");
}
@Override
public void selectItem(String item) {
System.out.println("Item selected: " + item);
// Transition to the DispensingState to dispense the item
}
@Override
public void dispenseItem() {
System.out.println("Item dispensed. Enjoy your purchase!");
// Transition back to the NoMoneyState
}
}class OutOfStockState implements VendingMachineState {
@Override
public void insertMoney(int amount) {
System.out.println("Sorry, the machine is out of stock.");
}
@Override
public void selectItem(String item) {
System.out.println("Sorry, the machine is out of stock.");
}
@Override
public void dispenseItem() {
System.out.println("Sorry, the machine is out of stock.");
}
}Step3: Create a VendingMachine class that will use the VendingMachineState interface and maintains the current state and delegates state-specific actions to the current state object.
class VendingMachine {
    private VendingMachineState currentState;

    public VendingMachine() {
        // Initialize the vending machine in the NoMoneyState
        currentState = new NoMoneyState();
    }

    public void setState(VendingMachineState state) {
        this.currentState = state;
    }

    public void insertMoney(int amount) {
        currentState.insertMoney(amount);
    }

    public void selectItem(String item) {
        currentState.selectItem(item);
    }

    public void dispenseItem() {
        currentState.dispenseItem();
    }
}
Step4: In main class create a vending machine instance, inserts money, selects items, and demonstrates state transitions.
public class VendingMachineDemo {
    public static void main(String[] args) {
        VendingMachine vendingMachine = new VendingMachine();

        vendingMachine.insertMoney(50);
        vendingMachine.selectItem("Soda");

        vendingMachine.setState(new ReadyToDispenseState());
        vendingMachine.selectItem("Soda");
        vendingMachine.dispenseItem();

        vendingMachine.setState(new OutOfStockState());
        vendingMachine.insertMoney(25);
        vendingMachine.selectItem("Chips");
        vendingMachine.dispenseItem();
    }
}
OUTPUT:
Money inserted: 50 cents
Please insert money first.
Item selected: Soda
Item dispensed. Enjoy your purchase!
Sorry, the machine is out of stock.
Sorry, the machine is out of stock.
Sorry, the machine is out of stock.
Conclusion
The State Pattern provides an elegant solution for managing an object’s behavior as it transitions through various states. By encapsulating each state in separate classes, it promotes code organization, extensibility, and maintainability while eliminating complex conditional logic. This pattern is particularly valuable when dealing with objects that exhibit diverse behaviors based on their internal state.