Last Updated on February 2, 2025 by KnownSense
In recent years, IntelliJ IDEA from JetBrains has rapidly emerged as the leading IDE for Java developers. According to Google, IntelliJ IDEA is currently the most popular Java IDE. A key feature that makes IntelliJ so attractive to Java developers is its capability to be extended through plugins, allowing for the creation of new functionalities. In this tutorial, we’ll explore how to create an IntelliJ plugin and highlight several ways to enhance the IDE’s capabilities.
Dev Guide
Creating an IntelliJ IDEA plugin involves a few key steps. Here’s a simple step-by-step guide to create a simple plugin. We have to option to do it in either Java or Kotlin. We will implement in Kotlin and use IntelliJ IDEA as our IDE.
Prerequisite
- Install IntelliJ IDEA Ultimate (recommended) or Community Edition. You can follow intelliJ official installation-guide
- Install and enable plugin-devkit
- Go to File > Project Structure > SDKs, select IntelliJ IDEA SDK, and choose the right version. (IDE Plugin projects require a minimum of Java 17.)
Create Skeleton Project
- Go to the new projects flow and select IDE Plugin
- Provide the necessary details such as Name, Location, Artifact, JDK, and Group, then click Create to proceed.
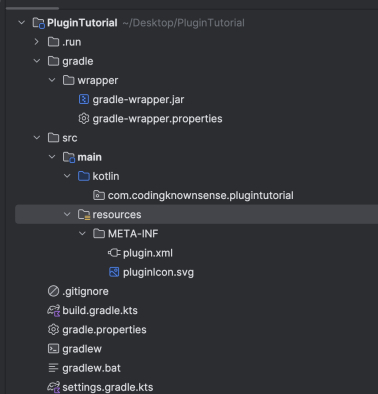
The above steps will generate a skeleton project with the directory structure shown below where com.codingknownsense is our group and PluginTutorial is project name
Add Action Configuration
Include the following code in your plugin.xml:
    <actions>
        <action id="MyPlugin.MyAction"
                class="com.codingknownsense.plugintutorial.MyAction"
                text="My Custom Action"
                description="Performs a custom action"
                icon="AllIcons.Actions.Execute">
            <add-to-group group-id="ToolsMenu" anchor="last"/>
        </action>
    </actions>
Explanation:
id: Unique identifier for your action.class: Fully qualified name of the class implementing the action.text: Display name of the action.description: Short description shown in the status bar.icon: Optional, specifies an icon.
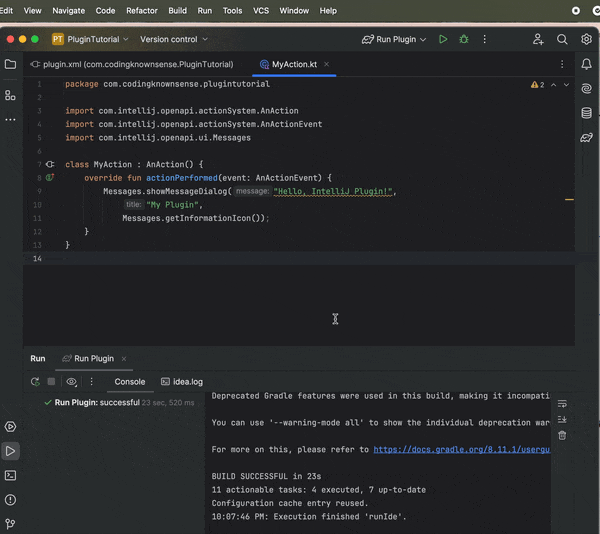
Create a Kotlin File
Add a Kotlin class with the following code in directory “kotlin/com/codingknownsense/plugintutorial”
package com.codingknownsense.plugintutorial

import com.intellij.openapi.actionSystem.AnAction
import com.intellij.openapi.actionSystem.AnActionEvent
import com.intellij.openapi.ui.Messages

class MyAction : AnAction() {
    override fun actionPerformed(event: AnActionEvent) {
        Messages.showMessageDialog( "Hello, IntelliJ Plugin!", "My Plugin", Messages.getInformationIcon())
    }
}
Explanation:
actionPerformed: This method is called when the action is triggered.Messages.showMessageDialog: A simple dialog to confirm your plugin works.
Build the Plugin
Open Terminal in IntelliJ and Run below command
./gradlew buildPluginAfter building, the plugin a zip file will be located in “build/distributions/”
Test the Plugin
Open IntelliJ Settings.
Go to Plugins → Click on settings button and Install Plugin from Disk.
Select your generated ZIP file (build/distributions/my-plugin.zip).
Restart IntelliJ to apply changes.
Go to Tools → My custom Action and see the magic 😀
(Optional) Publish to JetBrains Marketplace
To publish your plugin:
- Create an account at JetBrains Marketplace.
- Submit your plugin through Upload Plugin.
- Add a description, version, and documentation.
Now your Kotlin IntelliJ Plugin is successfully built, tested, and ready to use! 🚀