Last Updated on October 6, 2023 by KnownSense
In this section, we’re going to look at the standards and technologies that are available to make our microservices visible so that we can make visible the data and functionality that our microservices provide to everyone in our organization. One of the ways of doing this is by exposing a special endpoint using a framework that supports OpenAPI. OpenAPI and API Catalogs are two related concepts in the world of application development and API management.
OpenAPI
OpenAPI, formerly known as Swagger, is a specification for defining and documenting RESTful APIs. It provides a standard way to describe the capabilities of an API, including details such as endpoints, request and response formats, authentication methods, and more. OpenAPI uses JSON or YAML files to define API specifications, making it easy for developers to understand and work with APIs.
API Catalogs
API Catalogs are repositories or databases which can created on top of openAPI. It store information about the APIs available within an organization or across different organizations. These catalogs serve as centralized hubs for discovering, managing, and consuming APIs. API catalogs can be implemented using various tools and platforms
Benefits
OpenAPI and API Catalogues provides visibility and interactivity with our microservices in a test environment or a development environment which provides a huge advantage to our development teams who can work on our microservices concurrently knowing exactly what each team with their microservices is exposing in terms of data and functionality. And then in addition to these, these interactive API catalogs can be used by other parts of the business, the nontechnical side to view exactly what microservices we have and what data and functionalities we have available. API catalogs often include monitoring and analytics features, allowing organizations to track API usage, performance, and error rates. it also centralize security measures such as authentication and authorization, helping protect sensitive data and resources.
Implementation
So now let’s take a quick look at an example to implement OpenAPI standard that make our microservices visible. So here we have our demo service.
Step 1: Set Up a Spring Boot Project
You’ll need a Java development environment installed, such as JDK and Maven or Gradle. You can use Spring Initializr to quickly create a Spring Boot project:
- Visit the Spring Initializr website: https://start.spring.io/
- Configure your project options, including the project type (Maven or Gradle), language (Java), and Spring Boot version.
- Add the following dependencies:
- Spring Web
- Spring Boot DevTools (optional for development)
- Generate the project and download the ZIP file.
Step 2: Add Springdoc-OpenAPI Dependency
For the integration between spring-boot and swagger-ui, add the library to the list of your project dependencies (No additional configuration is needed)
   <dependency>
      <groupId>org.springdoc</groupId>
      <artifactId>springdoc-openapi-starter-webmvc-ui</artifactId>
      <version>{springdoc-latest-version}</version>
   </dependency>
Step 3: Configure Swagger for API Documentation
Springdoc-OpenAPI integrates seamlessly with Spring Boot, and you don’t need to create a custom Swagger configuration. However, you can customize the behavior if needed.
Step 4: Create a Controller
Create a Spring Boot controller to handle API requests. For this example, let’s create a simple controller that generates text:
import org.springframework.web.bind.annotation.GetMapping;
import org.springframework.web.bind.annotation.RequestParam;
import org.springframework.web.bind.annotation.RestController;

@RestController
public class TextGenerationController {

    @GetMapping("/generate-text")
    public String generateText(@RequestParam String prompt) {
        // Replace this with your OpenAI integration logic
        return "Generated text for prompt: " + prompt;
    }
}
Step 5: Add OpenAPI Annotations to Controller
To document your API using OpenAPI annotations, you can add @Operation and other relevant annotations to your controller methods. Here’s an example:
import org.springframework.web.bind.annotation.GetMapping;
import org.springframework.web.bind.annotation.RequestParam;
import org.springframework.web.bind.annotation.RestController;
import io.swagger.v3.oas.annotations.Operation;
import io.swagger.v3.oas.annotations.Parameter;

@RestController
public class TextGenerationController {

    @GetMapping("/generate-text")
    @Operation(summary = "Generate Text", description = "Generates text based on the provided prompt.")
    public String generateText(
         @Parameter(description = "Text prompt") @RequestParam String prompt) {
        // Replace this with your OpenAI integration logic
        return "Generated text for prompt: " + prompt;
    }
}
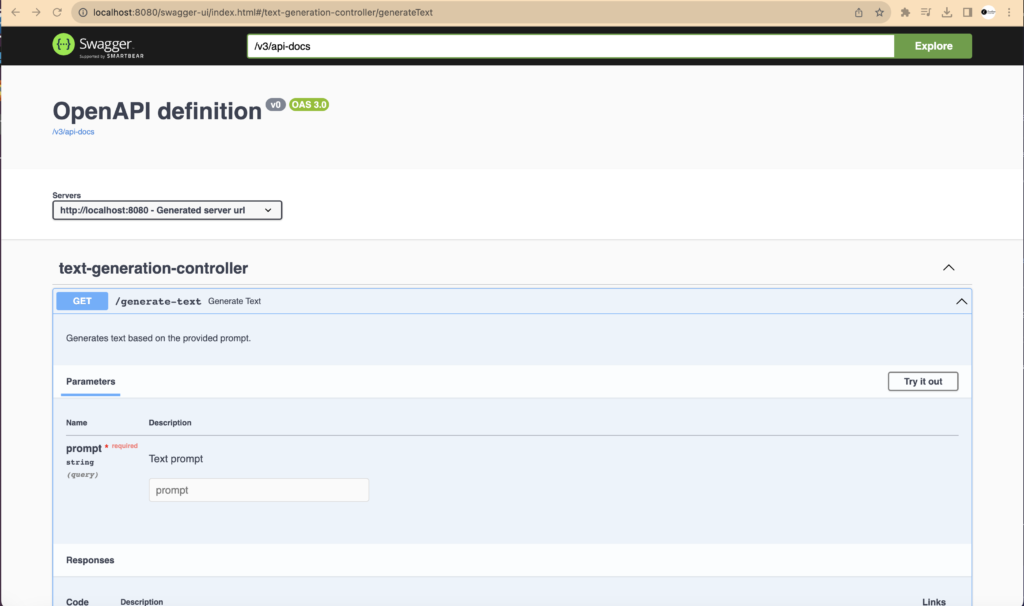
Step 6: Run and Test Your Application
Now, run your Spring Boot application. You can access the OpenAPI documentation at /swagger-ui.html. It provides interactive documentation for your API, and you can use it to test your “generate-text” endpoint with different prompts.
Don’t forget to check Swagger with SpringBoot3 Native to learn the swagger implementation with graalVM approach
Conclusion
In summary, OpenAPI is a specification for defining and documenting APIs, while API catalogs are repositories for managing and discovering APIs. Both concepts offer numerous benefits, including improved documentation, collaboration, governance, and security, which are essential for effective API management and development.