Last Updated on July 9, 2023 by KnownSense
What is Graal:
GraalVM(General Recursive Applicative and Algorithmic Language Virtual Machine) is a high-performance runtime, enhancing application performance and efficiency making a great choice for microservices infrastructure.
Supports programs written in
- Java
- Javascript
- C and C++
- and other dynamic languages(Ruby, Scala, Kotlin etc.)
It removes the isolation between programming languages and enables interoperability in a shared runtime.
Pre-requisite:
- Docker needs to be installed for running native-images. For native.exe, you can skip this step
- VisualStudio to be present. native-image requires “cl.exe” as well which is the compiler for native images. So for the same you need to have the VisualStudio code installed in your system with C++ compiler as the same will provide the native compiling environment to build the native-images and executables.
Steps for the same is also added in the Installation section.
Going Native with Java:
Seeing the current way of using traditional approach Java programs are compiled to bytecode. At runtime the bytecode is first interpreted and eventually compiled to machine code by a JVM.
With native coming in picture java programs can be compiled ahead-of-time to produce a native executable or native image.
This native image can run standalone without relying on a JVM giving a help in
- faster application startup
- lower latency
- lower memory and CPU usage reducing the overall resource cost
GraalVM enables running JavaScript, R, Python, Ruby, LLVM IR and Web Assembly in the context of Java applications. It offers the ability to expose Java data structures to those languages with fine-grained host access filters. The integration is language-agnostic, i.e., an integration for JavaScript can at the later point be also used to execute any other GraalVM-based language.
Proxy mechanisms allow mocking up dynamic objects from Java data structures and expose them to the embedded scripts.
Installation:
Couple of steps needs to be followed to implement graal native approach on Spring Boot applications on Windows and Mac OS.
Follow the steps below:
1. Download and install the GraalVM. The software can be found on the below link. Unzip the file and install it in your system.
https://github.com/graalvm/graalvm-ce-builds/releases/tag/vm-22.3.0
2. Once the GraalVM is installed, you need to have the native-image also installed in the system. It will not come pre-installed with GraalVM, use the gu command prompt in the bin folder of GraalVM directory to install the same.
gu.cmd install native-image

3. Now native-image should also be available in your bin folder. Check and confirm the same. If it is available then we are good to go with the next step of setting the JAVA_HOME to point to the native JDK of GraalVM. To set the same use the below command,
set JAVA_HOME=<directory path of GraalVM>

4. Once the GraalVM is set you can check the same using the below commands to see if the java is being pointed to GraalVM and not the installed JDK’s.
mvn --version
or java --version

VisualStudio Installation:
Keep in mind that the native-image requires “cl.exe” as well which is the compiler for native images. So for the same you need to have the VisualStudio code installed in your system with C++ compiler as the same will provide the native compiling environment to build the native-images and executables.
On Windows, Native Image requires Visual Studio Code and Microsoft Visual C++(MSVC).
There are two installation options:
1. Install the Visual Studio Code Build Tools with the Windows 10 SDK
2. Install Visual Studio Code with the Windows 10 SDK
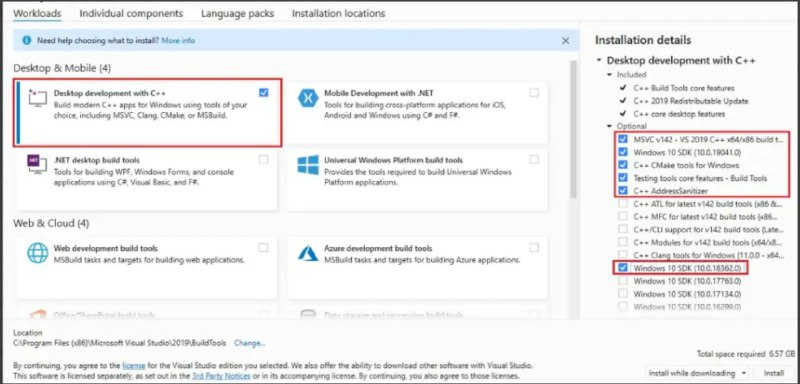
a. Download the Visual Studio Build Tools (C development environment) from visualstudio.microsoft.com.
b. Start the Visual Studio Build Tools installation by clicking on the .exe file, and then press Continue.
c. Check the Desktop development with C++ box in the main window. Also, on the right side under Installation Details, choose Windows 10 SDK, and click the Install button.
d. Install and reboot the system.
Windows 10 SDK Steps:
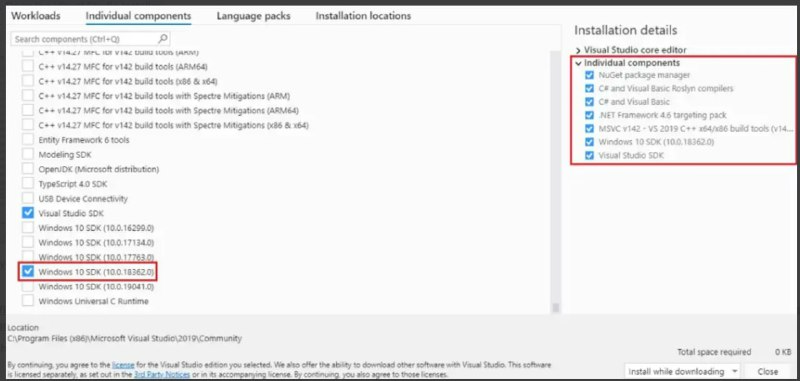
If you have Visual Studio 2019 installed, you will need to ensure Windows 10 SDK is available too:
a. Open the Visual Studio Installer.
b. Under the Installed tab, click Modify and choose Individual Components.
c. Then scroll to the bottom and check if Windows 10 SDK is installed and confirm the build tools are installed.
Yippiiee…..!! All set to do the native development.
Special Note: Keep in mind to use the x64 Native Tools Command Prompt for VS for development of native-images in Windows.
SpringBoot2 vs SpringBoot3 development:
The above installation is for Graal. But the process of aot native development is different in Boot2 and Boot3. Lets understand both:
A. SpringBoot2:
There are limitations in Graal for Boot2 as it has now been superseded by SpringBoot3. But still if you wanna go ahead and explore, follow the below approach:
pom.xml needs to be modified with mentioned content:
Dependency:
  <dependency>
    <groupId>org.springframework.experimental</groupId>
    <artifactId>spring-native</artifactId>
    <version>${spring-native.version}</version>
  </dependency>
Plugins:
<plugins>
    <plugin>
        <groupId>org.springframework.boot</groupId>
        <artifactId>spring-boot-maven-plugin</artifactId>
        <configuration>
            <classifier>${repackage.classifier}</classifier>
            <image>
                <builder>paketobuildpacks/builder:tiny</builder>
                <env>
                    <BP_NATIVE_IMAGE>true</BP_NATIVE_IMAGE>
                </env>
            </image>
        </configuration>
    </plugin>
    <plugin>
        <groupId>org.springframework.experimental</groupId>
        <artifactId>spring-aot-maven-plugin</artifactId>
        <version>${spring-native.version}</version>
        <executions>
            <execution>
                <id>test-generate</id>
                <goals>
                    <goal>test-generate</goal>
                </goals>
            </execution>
            <execution>
                <id>generate</id>
                <goals>
                    <goal>generate</goal>
                </goals>
            </execution>
        </executions>
    </plugin>
</plugins>
Profiles:
<profiles>
    <profile>
        <id>native</id>
        <properties>
            <repackage.classifier>exec</repackage.classifier>
            <native-buildtools.version>0.9.13</native-buildtools.version>
        </properties>
        <dependencies>
            <dependency>
                <groupId>org.junit.platform</groupId>
                <artifactId>junit-platform-launcher</artifactId>
                <scope>test</scope>
            </dependency>
        </dependencies>
        <build>
            <plugins>
                <plugin>
                    <groupId>org.graalvm.buildtools</groupId>
                    <artifactId>native-maven-plugin</artifactId>
                    <version>${native-buildtools.version}</version>
                    <configuration>
                        <buildArgs>-H:-CheckToolchain -H:+ReportExceptionStackTraces</buildArgs>
                        <mainClass>com.knowsense.springnative.SpringNativeApplication</mainClass>
                    </configuration>
                    <executions>
                        <execution>
                            <id>build-native</id>
                            <phase>package</phase>
                            <goals>
                                <goal>build</goal>
                            </goals>
                        </execution>
                    </executions>
                </plugin>
            </plugins>
        </build>
    </profile>
</profiles>
Spring native version used:
<spring-native.version>0.12.1</spring-native.version>Commands to compile and run:
- Build Commands for native executables:
mvn clean package -Pnative
where native is the profile you want to build.
The above command will create an executable file with your set application_name.exe. Go to the target folder and type application_name.exe to run the executable.
- Build Commands for Docker Image:
$ ./mvnw image_name:build-image
Run the above using:
$ docker run --rm -p 8080:8080 image_name:image_versionB. SpringBoot3:
It has made it easy as the above features are baked-in in the 3.0.0+ versions. So cubersome code and adding of the above dependencies are no more required.
Boot3 also requires java 17 above. So please install the respective compatible Graal version. Procedure to install will be the same as described above.
pom.xml
   <plugin>
        <groupId>org.graalvm.buildtools</groupId>
        <artifactId>native-maven-plugin</artifactId>
   </plugin>
Commands to compile and run:
  1. For building the Native Executables :
       mvn -Pnative native:compile

  2. For Native Docker Image:
       mvn spring-boot:build-image -Pnative
Run command:
./target/<name-image>You can place the above command in your dockerfile to run docker native-images in docker or K8s environment.
Conclusion: As already mentioned above it is advised to go ahead and work with the SpringBoot3 instead of Boot2 for using the enhanced and in-built Graal functionalities.
Authored by codingknownsense.com
Good read